
How To Remove Kitchen Cabinets
If you’re a DIY type of person and need to remove your old kitchen cabinets, then you’ll want to follow this guide on how to do exactly that. Check out these steps on how to remove kitchen cabinets.
Removing kitchen cabinets can seem like an impossible task if you’ve never done it before, but with the right tools and some careful planning, it’s quite simple to take off your cabinets and make room for new ones to be installed! So let’s figure out how to remove kitchen cabinets.
Preparing For Kitchen Cabinet Removal
Wall-mounted cabinets are usually easy to take down without too much trouble. But if your cabinets are old or particularly hard to disassemble, you may need to rip them out from the wall. When you’re trying to remove your kitchen cabinets, be careful not to damage the drywall as you lower the old cabinets down.
You may need a partner to help safely take them apart. If so, be sure to communicate and work together so that the job gets done quickly and efficiently. It’s also important to plan ahead by shutting off power in any areas where power tools will be used.
Remove all doors, shelves, drawers, and hardware before removing the cabinets. Depending on how long they have been there, it could take some time for the paint on the walls to release from all those surfaces. Once removed, wipe down everything with mineral spirits and then repaint after making any repairs (if necessary).
Some tools that you’ll require for kitchen cabinet removal are:
- Drill
- Gloves
- Pry bar
- Utility knife
- Hammer or mallet
- Goggles
- Putty knives
Once you are sure that you have all of your tools and preparations in place, you can begin removing your old cabinets. The first step is to secure any delicate objects on your countertop with bubble wrap or other material that will protect them from falling into open areas underneath the cabinet.
how to remove kitchen cabinets
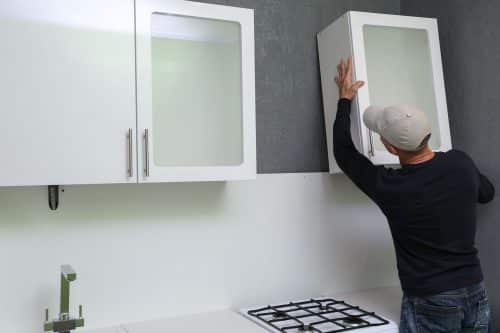
The hardest part of removing a kitchen cabinet is getting started. Once you have the right tools, the process is relatively simple. As already mentioned, remove all the doors and drawers from the cabinet. This step just makes the entire cabinet removal process much easier.
Next, disconnect any electrical wiring that may be attached to the cabinet. Finally, use a screwdriver or drill to remove the screws that hold the cabinet in place. As you’re removing the screws from the cabinets, you’ll want to have a friend or family member hold your cabinets so they don’t come crashing down after the screws have been removed.
Once you’ve removed all of your kitchen cabinet doors and drawers, disconnect any electrical wiring or gas lines that may have been attached. Be sure to turn off all switches before working with them. Use a screwdriver or drill to remove screws attaching your cabinets to your walls or countertops.
Using a screwdriver can be tricky because it requires precision, but you can use an electric drill for speedier removal. For very stubborn screws, consider using an adjustable wrench instead of a screwdriver; it provides more leverage than a screwdriver and will help you bust through tough spots.
If you have wall-mounted cabinets, starting at one corner of your room, use a hacksaw and trim any nails holding them in place. Remove any screws and remove one end of the cabinet from its hanger. Then carefully pull it away from the wall and push it up against another wall so that you can work on the other side. If your cabinet isn’t removable from its hanger, you may have to pry it off with a crowbar, depending on how hard or soft your walls are.
After Removing Kitchen Cabinets
- After you’ve removed the cabinets from the wall, gently place them down on the ground.
- Use a putty knife to scrape off any old caulking or sealant around the edges of the cabinet.
- If the cabinet is painted, use a heat gun or hair dryer to loosen the paint around the edges of the cabinet. Be careful not to overheat the wood!
- Once the paint is loosened, use a putty knife or scraper to remove any remaining paint from the surface of the cabinet.
- If you’re planning on reusing the cabinets, sand down any rough edges and apply a new coat of paint or stain.
- If you’re using a finish like a stain or paint (more on that later) that may be difficult to clean later, apply a coat of primer before putting on your top coat. This will help prevent any stains from bleeding through your top layer of paint and staining anything underneath it.
The primer will also make sanding easier, as it gives wood grain something to bite into while sanding instead of just skating over smooth varnish or lacquer coats like water on ice. After applying two coats of paint or stain and allowing 24 hours for each layer, you’re ready to reattach your cabinet!
Attach with screws placed every 4–6 inches around cabinet perimeters and at least 2 in high-stress points (corners).
What Should I Do With My Old Kitchen Cabinets?
There are a few options for what to do with old kitchen cabinets. You could donate them to a local Habitat for Humanity, or repurpose them into something else entirely. If you’re feeling handy, you could even try upcycling them into new cabinets.
If your cabinets are in good condition, they may be worth selling. Before you do that though, you’ll need to clean them up and make sure they’re in good condition. You can look at them with a critical eye and decide if they have any damage or hidden problems that need attention.
If your cabinets are in good condition but don’t match the new ones, they may be worth reusing or giving away to someone who needs them.
If your cabinets are damaged or beyond repair, then you’ll need to decide what to do with the wood. If it’s not too warped or damaged, you may be able to use the wood for another project like building furniture or other items around the house.
Should I Finish My Old Kitchen Cabinets?
There are a number of ways to finish old kitchen cabinets. Some people choose to paint the cabinets and others choose to stain or varnish them. The choice will depend on your budget, the style of your kitchen, and the condition of your cabinets.
Paint
If your cabinets are in decent shape and only need a bit of love, there are several ways to update them. One option is to paint the cabinets with high-quality acrylic latex paint. This can be done by professionals or DIYers, but it’s important to use the right type of paint.
Choosing the right color is also important when painting kitchen cabinets. You should choose a color that matches other fixtures in your home — such as countertops and backsplashes—as well as any existing flooring or furniture. The goal is to create continuity throughout the space while keeping things simple and cohesive across different areas of your home.
Painting old kitchen cabinets is an inexpensive way to update them without having to replace them. It’s also a good option if you have a limited budget or want a quick fix for your kitchen. Painting can be done with latex paint or oil-based enamel, depending on what type of surface you have.
Stain
Staining old kitchen cabinets can give them a more rich appearance and add depth to their color. Staining wood is a good option if you like the natural look of wood but want something that lasts longer than paint does. Stains are available in different colors and finishes so you can match your finished product to existing cabinetry in your home or office.
Varnish
The most expensive way to finish old kitchen cabinets is by varnishing them. Varnish creates a glossy finish that makes the wood look new again, but this method requires more time and effort than other options do because it must be applied multiple times before it cures completely.
If you have old kitchen cabinets, you may want to consider refinishing them. Refinishing is a cost-effective way to update your kitchen with custom cabinets. The following are some tips and tricks to help you complete this project.
To Finish Your Old Kitchen Cabinets
First, remove all the doors and drawers from the cabinet boxes. This will make it easier for you to reach inside the cabinet frame and sand everything down. Sanding will ensure that all rough edges are smoothed out so that no splinters remain when your new paint is applied.
Next, clean off any old paint or dirt with a damp cloth or paper towel; after cleaning, wipe down the surface with a tack cloth so there are no fibers left behind on the surface of the wood.
Next, apply an oil-based primer over all surfaces of each cabinet box (including sides and bottoms). Allow this primer to dry completely before moving on to painting. You can use paint brushes or rollers while applying this primer; just make sure that you avoid getting any primer on any surfaces where it would be difficult to reach later on during the final finishing stages (such as around handles).
Once all surfaces have been primed, begin applying a layer of latex paint over them using either spray or brush application methods.
Final Thoughts
Kitchen cabinet removal might seem like an intimidating task to accomplish on your own, but by following the steps in this guide, you’ll have an easier time getting the job done.